Door Hardware
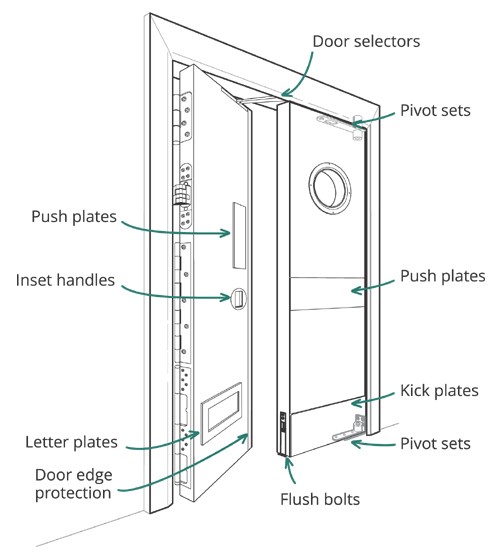
Cooke Brothers provide a range of high-grade Architectural Hardware including stainless steel and brass door fittings.
Types of Architectural Door Hardware include:
Flush Bolts
Flush Pulls and Inset Handles
Push and Kick Plates
Letter Plates & Inner Tidies
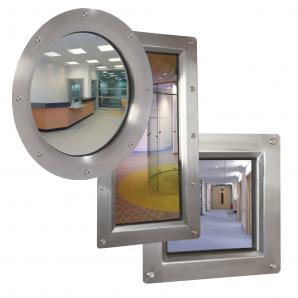
Vision Panels
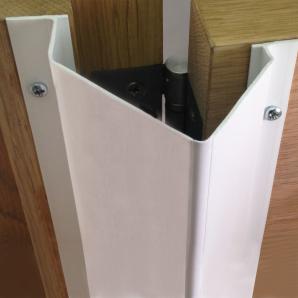
Finger Protection Devices
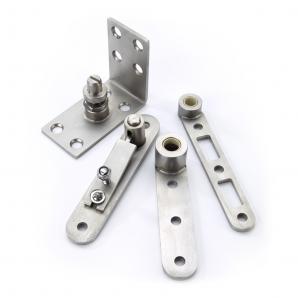
Pivot Sets
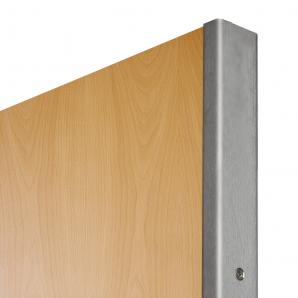
Door Edge Protection
Architectural Hardware Applications
We provide Architectural Hardware solutions for commercial applications including flush pulls and inset handles in a range of striking and stylish designs to suit the look and feel of any commercial premises.
Why buy Architectural Hardware from Cooke Brothers
At Cookes Brothers we’ve been making Architectural Hardware and Hinges for generations, so we know a thing or two about constructing high-grade hardware. We stock a wide range of designs and styles to suit any environment including various material and finish options.
Contact our team to find out more about Architectural Door Hardware.
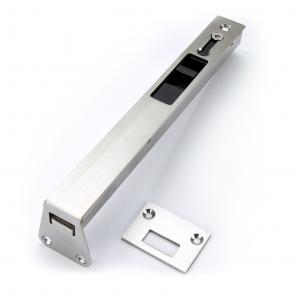
Flush Bolts
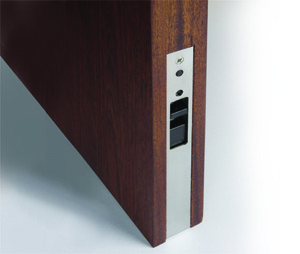
Stainless Steel Flush Bolt & Keep have a sprung internal system designed to minimise the cut out in the door. The flush bolt is designed to fit to the face of the door and available as standard in Satin and Polished 316 Stainless Steel.
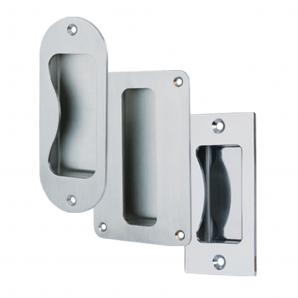
Flush Pulls and Inset Handles
Cooke Brothers are one of the UK's leading manufacturers of Architectural Hardware, with flush pulls and inset handles being an integral part of this range.
Flush pulls and inset handles are suitable for both internal and external doors. The standard range of styles includes square, rectangular, round and obround.
A designer range is also available on request - Art Deco, Twin, Eye, Edge and Yin Yang.
There is also the option for Architects and designers to design their own unique fascias in order to match a particular building décor, period, style or interior theme.
The Stainless Steel fascias are available in a range of finishes including satin or bright polished, brass lacquered or powder coated. Aluminium fascias are available as clear or colour anodised.
Where required bespoke screen printing of names, pictograms or logotypes can be applied to any Inset Handle fascia. Phoenix Inset Handles have been designed and tested to comply with 30 and 60 minute fire testing in accordance with BS EN 1634.
Traditional and Standard Range
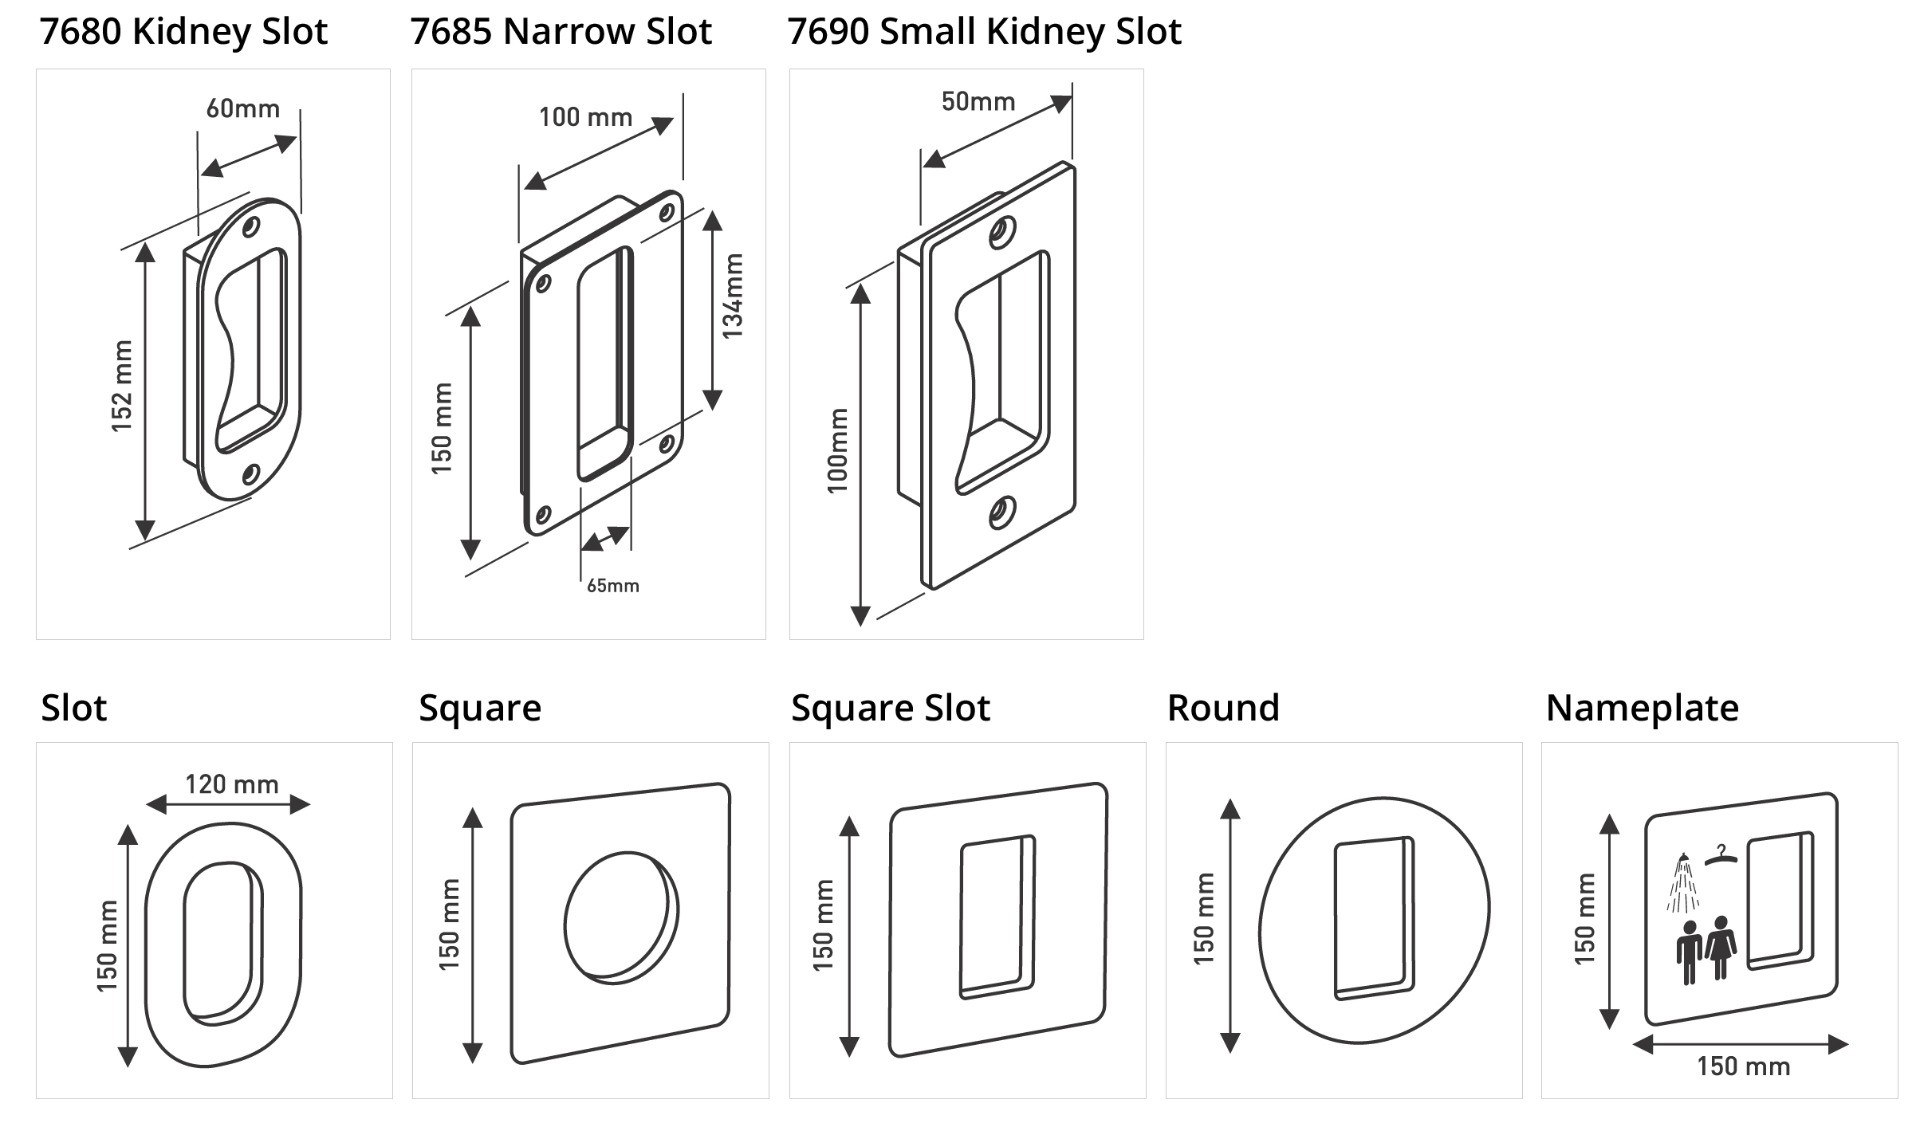
Both ranges continue to be extremely popular with architects, specifiers and joinery contractors. Suitable for use on many different door sets including, sliding, folding or where space constraints eliminate the use of traditional lever or pull handles, flush pulls and inset handles provide a unique solution.
Available in a range of shapes, sizes and designs with optional extras including matching or contrasting back box finishes and signage options on the nameplate range.
Suitable for use on fire doors following successful fire tests to BSEN1634 – Please contact sales for further information.
Manufactured from Stainless Steel Grade 304 and available in a range of decorative finishes.
Cooke Brothers utilize the latest laser cutting technology as part of our manufacturing process and therefore has the ability to create unique designs or manufacture specials based upon your own requirements, please contact our sales department for more information.
Designer Range
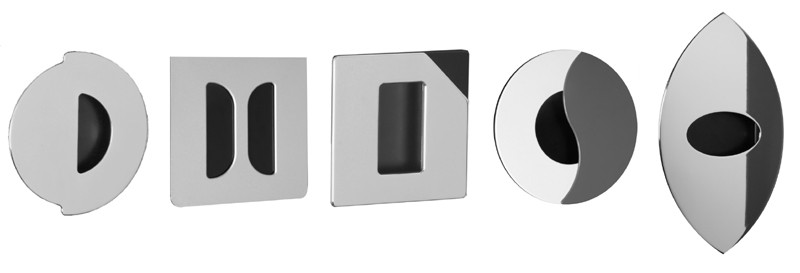
Based around existing design styles we have developed five themed ranges including Art Deco, Twin, Edge, Eye and Yin Yang.
Suitable for both internal and external doors they have been designed to provide instant visual impact whilst maintaining an ergonomic solution for access.
Manufactured from Aluminium or Stainless Steel Grade 304 and in a wide range of finish options.
Please contact our sales team for more information.
Fitting Instructions
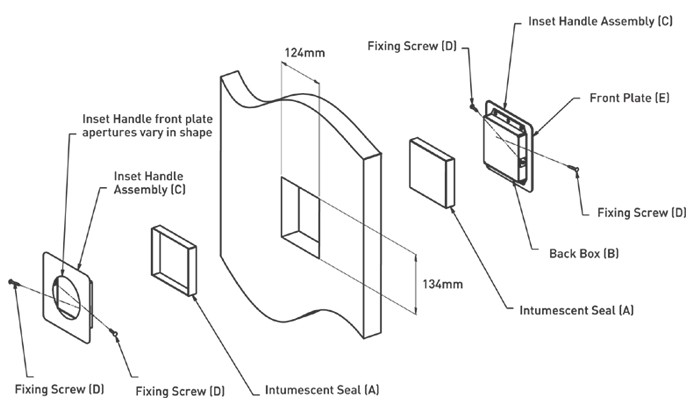
Fixing instructions for Inset Handles (Back to Back) Large Back Box
- Cut the aperture in the door in the required position.
- Raise the sides of the intumescent seals (A) along the scored lines.
- Place around the Back box (B) of the Inset Handle assembly (C) and insert the complete assembly into the aperture of the door.
- Ensure the edge of the front plate (E) of the Inset Handle is parallel to the door edge (for shaped front plates measuring from the centre of the front plate will apply). Fix the Inset Handle to the door using the wood screws (D) provided, piercing the intumescent strip with the fixing screws.
- Repeat instruction 1-5 for fitting the Inset Handle to the opposite face of the door.
Inset Handles technical specification
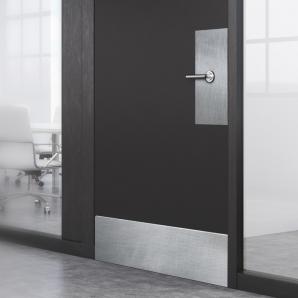
Push and Kick Plates
Push & Kick plates are available in a wide range of sizes in stainless steel and aluminium. Custom sizes, bespoke designs and finishes are also available.
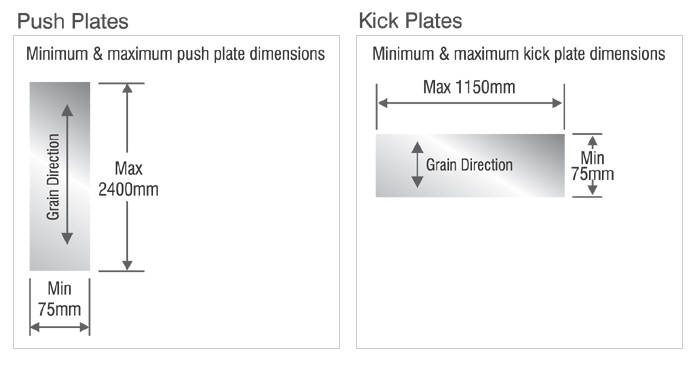
CUSTOM SIZE PUSH & KICK PLATES
Create your own custom size push and kick plates with our quick and easy to use calculator. Select from a large range of materials, thicknesses and finishes. Simply fill in your requirements for an instant made to measure quote where you can add directly to basket.
Click here to create your own custom size push or kick plate.
Additional Options
Laser cut radius corners
Laser cut aperture up to 75mm diameter
Tapped holes M4 - M8
Laser engraving
Labelling for individual doors
Custom Size Push and Kick Plates
Made to Measure push and kick plates are available in a selection of materials and finishes. Click here to create your custom push or kick plate.
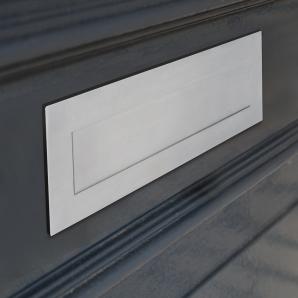
Letter Plates & Inner Tidies
Commercial letter plates form an important and popular addition to the comprehensive range of architectural products available from Cooke Brothers.
Designed to suit applications where the standard flap size of a domestic letter plate is not sufficient to accept large envelopes or bulky mail, the larger apertures available in the Phoenix commercial size letter plates can comfortably accommodate deliveries of both size and volume.
Suitable for either direct door fixing or wall mounted as part of a through the wall chute system, the Phoenix range of high quality commercial letter plates and matching tidy flaps offers a durable and stylish focal point to any retail, office or public sector entrance.
To create added impact there is the option to include engraved external flaps with either a property number or a company name.
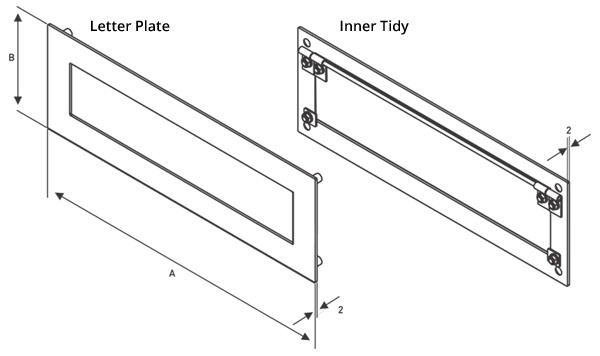
- Standard Range of Architectural letter plates and tidies, designed to provide a practical solution for commercial and domestic situations where bulky mail items can be an issue.
- Manufactured from both grade 304 and grade 316 stainless steel, they are suitable for use on external applications including coastal applications.
- Fully stainless steel construction including all spring mechanisms - this offers a major advantage over many standard letter plate designs which incorporate a mild steel spring.
- Fully secured design with internal bolt through fixings included.
- Standard range of sizes available from stock - other sizes available to special order.
- Bespoke manufacturing service available - manufactured utilising laser-cut technology, we have the ability to produce designs to suit your exact requirements.
- Please contact our technical sales department to discuss your requirements in greater detail.
Technical Details
To ensure a quality appearance and maintenance free performance, all Phoenix letter plates and tidies are manufactured from 304 grade stainless steel, with double stainless steel springs on the external flap and a single spring on the internal flap.
Internal fixing with four bolt through stainless steel screws ensures a secure tamper proof externally mounted plate.
Standard finishes available are satin stainless steel or polished stainless steel. Overall letter plate sizes are 300 x 100mm and 400 x 125mm. other sizes are available to special order.
| Architectural Letter Plates |
Code Number
Letter Plate |
Code Number
Inner Tidy |
Dimension A |
Dimension B |
| 4040 |
4041 |
300mm |
100mm |
| 4060 |
4061 |
400mm |
125mm |
| Materials |
| Stainless steel grade 304 |
| Stainless steel grade 316 |
| Finishes |
| Satin Polished (SSS) |
| Bright Polished (PSS) |
Fitting Instructions
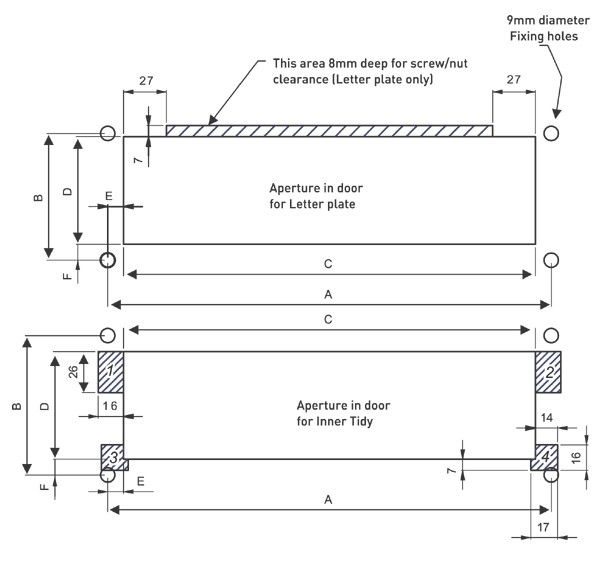
| Code Number |
Dimension A |
Dimension B |
Dimension C |
Dimension D |
Dimension E |
Dimension F |
| 4040 |
280mm |
80mm |
259mm |
66mm |
10mm |
10mm |
| 4060 |
380mm |
105mm |
359mm |
91mm |
10mm |
10mm |
Note
Areas, 1, 2, 3, and 4 to be cut into the opposite face of the door 8mm deep for screw/nut clearance on the inner tidy
1. Drill the four 9mm diameter holes
2. Cut the aperture in the door relative to the hole positions
3. Cut the shaded areas in the door for the screw / nut clearance in the Letter plate and tidy.
Letter Plate technical specification
Vision Panels
The Phoenix range of high quality door vision panels provide an excellent solution to both meeting visibility requirements and providing a smart, aesthetically pleasing appearance. Often referred to as portholes because of their naval origins, Phoenix vision panels are available in a wide range of options: Circular, Square and Rectangular. Decorative fascias are available on request to suite with our exciting range of Inset Handles.
Our vision panels are supplied as a complete modular unit ready for direct installation in to your pre-cut door blank. They can be fitted as either new build or retrofit in to existing door blanks, subject always to continuing to correctly meeting the fire rating of the individual doorset.
Manufactured in stainless steel, Phoenix Vision panels can be finished to enhance the appearance of any timber, composite, or metal door system.
Door types
Phoenix Vision Panels are suitable for all types of door construction: Timber, Composite, UPVC, and Metal.
Vision panel dimensions
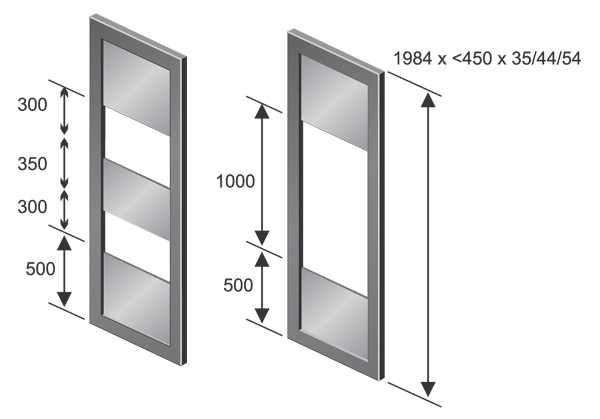
There are three sets of dimensions: The vision area, The door cut out, and the overall vision panel fascia dimensions.
Door cut out dimensions
Fire doors are rated as to the maximum permissible area that can be cut out for vision panels whilst still complying with the fire rating of the door blank. This will also show the location of the area within which the vision panel cut out must be confined. It is important to make sure that the total cut out area falls within the maximum area that can be removed from the door. The external dimensions of the fascia are not important from the fire rating perspective, but it is important to ensure that there is a sufficient flat area of the door for the whole of the fascia.
Vision areas
To comply with Access for All guidelines, vision panels should cover both the lower, as well as the upper, part of the door, as shown in the drawing. Meeting this requirement can be resolved through either a single long rectangular or oblong vision panel, or by fitting multiple vision panels.
Fixing methods
All Phoenix vision panels are designed to fix to their corresponding half on the other side of the door. This not only aids installation but also ensures that in the event of a fire the vision panel will remain in place for in excess of the requisite fire rated period.
Fixing options: Visible studs on both sides, Visible studs on one side only, Countersunk fasteners within the angled rim of one or both sides of the vision panel.
Solid or hollow doors
The above fixing system allows the Phoenix vision panels to be fitted to either solid or hollow core doors. Where the door structure is inadequate to ensure the rigidity of the door when clamping the vision panel in place, or to retain the fire intumescence material, additional liners can be quoted for.
Door thicknesses
The majority of vision panels are fitted to standard 44mm and 54mm door thicknesses. Phoenix vision panels are designed to cover a small variation in door thickness from the nominal sizes, but specifying the exact thickness of the doors will assist in ensuring the system supplied will match your doorsets.
Glazing systems
Phoenix vision panels have been rated for a wide range of different glazing systems.
Fitting Instructions
Example of fitting instructions for square vision panel through fasteners and visible fixing studs on both sides.
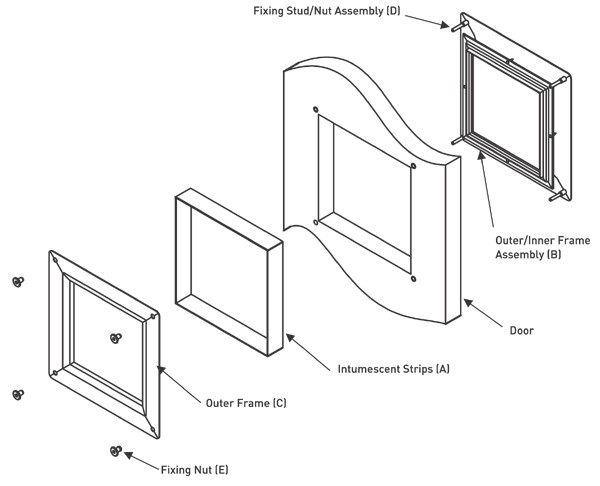
- Cut the aperture in the door in the required position (Check with Approved Document M - Building Regulations Access to and use of buildings), for the correct position.
- Remove backing paper from the Intumescent Strips (A) and position the intumescent strips around the inside of the aperture.
- Position the outer/inner frame assembly (B) into the aperture, ensuring it is parallel to the edge of the door and mark through the fixing holes.
- Drill the fixing holes with 10mm diameter bores, ensuring they are square to the face of the door.
- Position the ourter/inner frame assembly (B) and the outer frame assembly (C) into the aperture, pass the fixing stud nut assembly (D) through the fixing holes, then fit nut (E) on the opposite side.
- Ensure both frame assemblies are parallel to the edge of the door and tighten the fixing assemblies using the key provided ensuring the complete assembly is firmly fixed in place.
Vision Panel technical specification
Finger Protection Devices
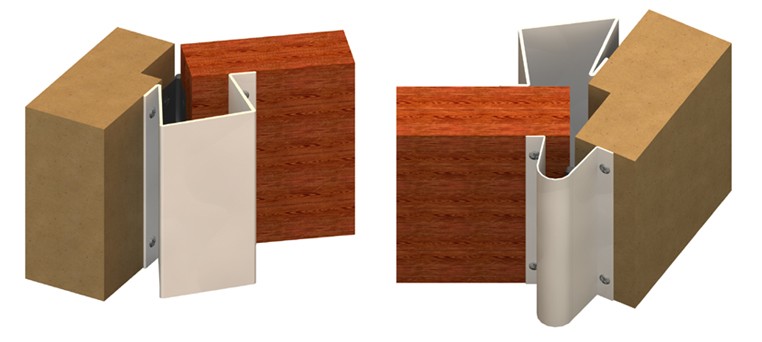
Finger protection devices are a simple, effective and inexpensive system for protecting hands or fingers being trapped between door and frame on the wider hinge opening side. A number of options are available.
Pivot Sets
Phoenix Double action Door Pivot Sets provide an unobtrusive and service free door hinge system that allows doors to swing freely in each direction. The pivots are designed for medium duty internal applications for door widths up to 1100mm and weights up to 80kg when floor mounted and up to 30kg when jamb mounted. The main pivot hinge components are manufactured from 304 grade stainless steel with self lubricating polymer bush bearings, which provide a maintenance free operation, guaranteed for 25 years. A 9mm radius is recommended on the pivot door edges for 44mm thick doors and a 12mm radius is required on 54mm thick doors. The set includes bottom pivot assembly, top pivot assembly and mounting brackets. The standard finish is satin stainless steel.
Phoenix door pivots can be used in conjunction with a lockable stop or lockable hinged door jamb to provide standard access in one direction only, with optional emergency access in the other.
Fitting Instructions
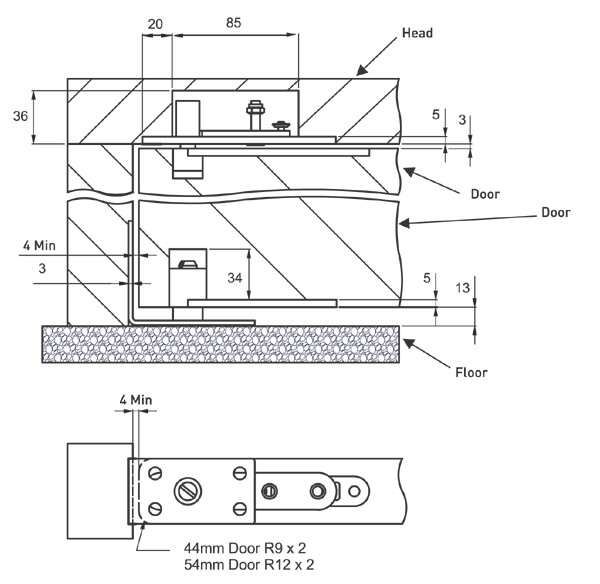
- Determine the position of the Pivot centre line in the door (top and bottom). Maintaining the 4mm minimum dimension between door and frame. Ensure pivots are in line. Fit the top and bottom door pivots in the door.
- Fit the top pivot into the head of the door frame, positioned to give the 4mm minimum dimension between the door and frame. Ensure top pivot moves freely after fitting.
- Fit the bottom pivot bracket to the door frame and door.
- Fit the door by lowering the door onto the bottom pivot. Position the top of the door so that the top pivot pin locates into the top door pivot, (the door needs to be in the open position). Turn the pivot pin setting screw in a clockwise direction to lower the pivot pin setting screw in a clockwise direction to lower the pivot pin into the top door pivot. Tighten the pivot pin setting screw.
- Adjustment is provided in the Bottom Pivot bracket to adjust the height of the door if required. The door has to be removed to be able to adjust the bottom pivot pin height. If adjusting be sure to tighten the lock nut after adjustment.
Pivot Sets technical specification
Door Edge Protection
Phoenix Door Edge Protection will help reduce damage and wear and tear to door edges, helping maintain appearance and, on older doors, improving unsightly damaged edges.
The Edge Protectors are available in a choice of materials and finishes enabling designers and specifiers to suite them with other architectural hardware.
They are particularly useful in high traffic areas or situations where heavy impact and damage is likely.
Door edge protection for lock side is also available.
Please contact our technical sales team to discuss your requirements.
Door Edge Protection technical specification
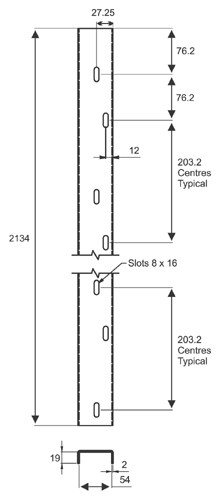
| 56090 CH Door Edge Protector |
| 56090CH |
Length
(mm) |
Leaf Thickness
(mm) |
Fixing Centres
(mm) |
| 44mm door thickness |
To order |
2 |
76.2 |
| 54mm door thickness |
To order |
2 |
76.2 |
Materials
|
| Stainless Steel Grade 304 |
| Finishes |
| Satin Polished (SSS) |
| Bright Polished (PSS) |
